· 8 min read
Kotlin DSL to write Gradle scripts on Android: Step by step walkthrough

There’s been quite some months already since Gradle announced that they were working on supporting Kotlin to write Gradle Scripts, by using a version of the language that has been recently revamped to Kotlin DSL.
At the beginning things were quite complicated, but nowadays, with latest versions of Kotlin DSL (at the time of writing this the version is 0.12) the idea is more mature.
So, knowing how, it’s not too difficult to start using Kotlin to build your Gradle files in Android.
One of the main issues of this is the lack of documentation, so I decided to write about my experience converting the Gradle files of Bandhook-Kotlin, so that you can replicate it in your project.
If you’re still starting with Kotlin, you may be interested in checking out my previous articles about Kotlin.
UPDATE: I recently published a YouTube video following the process to convert a Gradle file from Groovy to Kotlin, you can take a look:
https://www.youtube.com/watch?v=hlvSsad48Js
Using Kotlin DSL on your Gradle files. Is it worth it?
I guess this is the first question to solve. As of today, should I spend my time converting my files to Kotlin DSL?
My answer is probably a bit counterproductive to encourage you to continue reading this article, but I don’t want you to be hyped because of this: you probably shouldn’t.
It has of course some pros:
- You can used a language you’re more familiarized with, so it’s easier to start doing more complicated things. I had never done anything on
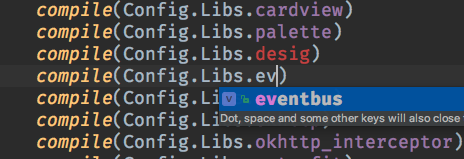
buildSrcfolder, and it was quite easy for me to create my own class and use it in the rest of the script files. - The IDE helps you a lot more: nice autocomplete, the errors are detected by the compiler, imports added automatically… All you know and love from your regular Kotlin code is kind of extrapolated here.
But also has some cons:
- There’s not a straightforward way to convert from Groovy to Kotlin files. I’ll explain to you how to make it easier though.
- You need to know how the plugin is implemented to be able to use it: where in Groovy you just use an equals to assign a value to every configuration, here you need to know whether it’s a function or a property to know how to set it. Gladly the IDE can help. Gradle team says that this will only be solved when people write the plugins thinking also on Kotlin DSL. There are some rules to follow. An example (we’ll see more later):
applicationId = Config.Android.applicationId
minSdkVersion(Config.Android.minSdkVersion)
targetSdkVersion(Config.Android.targetSdkVersion)
versionCode = Config.Android.versionCode
versionName = Config.Android.versionName
- There’s not much documentation or examples: I think this is the main problem. If you get stuck, it’s difficult to continue. It took me quite some time (and asking on the great Kotlin Slack) to know how to do some things.
So a big disclaimer here: be sure of what you’re doing if you use it in your production code. Can be an interesting thing to do in your pet projects though. I’m not saying it’s not mature enough, just that it’s not easy to use.
How to convert your files
I want to give you here the fastest route, by skipping all the pain points I had to solve. So if I had to convert another project to use Kotlin on Gradle files, that’s what I’d do.
Use the latest version of Gradle
The newer the Gradle version, the better, because it will include the latest Kotlin DSL version. When I converted this project, the latest one was 4.5.1. You can check the latest release here. Modify your gradle-wrapper.properties file to use it:
distributionBase=GRADLE_USER_HOME
distributionPath=wrapper/dists
zipStoreBase=GRADLE_USER_HOME
zipStorePath=wrapper/dists
distributionUrl=https\://services.gradle.org/distributions/gradle-4.5.1-all.zip
Change the name of your files
I must admit that, since first time I tried, things have improved a lot. Before, you had to add many configurations that you wouldn’t need when using Groovy.
Now, you just need to add an extension to your build.gradle files, and Gradle will be able to use Kotlin files. Rename them to build.gradle.kts.
Compile using the terminal
The IDE won’t help you much here in understanding what’s wrong, so I recommend you using cmd and the --info flag:
./gradlew assembleDebug --info
With this, you’ll get a better idea of the things that are not working. You can do it now if you want, but it will obviously fail.
Configure your buildSrc folder
One of the pain points I found was a way to replicate the ext object in Groovy, that allows you to share variables between Groovy files:
ext {
    // Android config
    androidBuildToolsVersion = "27.0.3"
    ...
}
You can have that in your root Gradle file, and then use it in your modules:
buildToolsVersion parent.ext.androidBuildToolsVersion
That’s pretty easy and works fine. The alternative in Kotlin DSL is this: for each variable you need to create an extra like this:
var androidBuildToolsVersion: String by extra
androidBuildToolsVersion = "27.0.3"
And then you use it with this:
val androidBuildToolsVersion: String by extra
buildToolsVersion(androidBuildToolsVersion)
As you can imagine, this doesn’t scale up very well. Having all this code for each variable is a pain.
So the alternative I found is to create a configuration file in the buildSrc, and add all you need in an object that you can then instantiate in any Gradle files. If you don’t know about it, the buildSrc is basically a place where you put all the code that you want to use when building the project scripts. You can find more info in Gradle Docs.
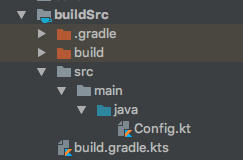
To configure it, just create this folder structure under the buildSrc folder:

Forget about .gradle and build folders and create the rest.
Under that folder, also create a new build.gradle.kts with this content:
plugins {
    `kotlin-dsl`
}
The Config file will be the one to hold the variables you may use in your project. You can use whatever structure you want. While looking for info on how to do this, I found the repository from Arturo Gutiérrez that uses this structure, and I liked it. I’ve moved to use objects instead of classes though, which makes more sense here:
object Config {
    object BuildPlugins
    object Android
    object Libs
    object TestLibs
}
Then, each child object has its own values. For instance, the Android one:
object Android {
    val buildToolsVersion = "27.0.3"
    val minSdkVersion = 19
    val targetSdkVersion = 27
    val compileSdkVersion = 27
    val applicationId = "com.antonioleiva.bandhookkotlin"
    val versionCode = 1
    val versionName = "0.1"
}
You can also use some top variables to make it easier to edit:
private const val supportVersion = "27.0.2"
...
object Libs {
    val appcompat = "com.android.support:appcompat-v7:$supportVersion"
    val recyclerview = "com.android.support:recyclerview-v7:$supportVersion"
    val cardview = "com.android.support:cardview-v7:$supportVersion"
    val palette = "com.android.support:palette-v7:$supportVersion"
    val design = "com.android.support:design:$supportVersion"
    ...
}
Then, using it in your build.gradle files is pretty straightforward:
    defaultConfig {
        applicationId = Config.Android.applicationId
        minSdkVersion(Config.Android.minSdkVersion)
        targetSdkVersion(Config.Android.targetSdkVersion)
        versionCode = Config.Android.versionCode
        versionName = Config.Android.versionName

        testInstrumentationRunner = "android.support.test.runner.AndroidJUnitRunner"
    }
As you see, it looks much cleaner.
Keep converting your Gradle files
Until the first time it completely compiles, you’ll have to rely on what the terminal builds say, the IDE won’t be very useful here.
So continue changing parts little by little, building the project, and interpreting the output. As a reference, I can leave you some parts of the Gradle files here (and you can, of course, check the complete project on Github).
For the root build.gradle:
buildscript {
    repositories {
        jcenter()
        google()
    }
    dependencies {
        classpath(Config.BuildPlugins.androidGradle)
        classpath(Config.BuildPlugins.kotlinGradlePlugin)
    }
}

allprojects {
    repositories {
        jcenter()
        google()
    }
}
This one becomes quite simple, as we’ve extracted all kinds of configuration to the Config.kt file.
The module file is a bit more complicated. For the plugins, you do it like this:
plugins {
    id("com.android.application")
    kotlin("android")
    kotlin("kapt")
}
For regular plugins, you just use the function id, and Kotlin plugins use the function kotlin.
Then the Android section is like you saw above. You need to try in order to discover whether it’s a function or a property. Check the repository for the most typical ones. Then, for the build types:
buildTypes {
    getByName("release") {
        isMinifyEnabled = false
        proguardFiles("proguard-rules.pro")
    }
}
You can’t just create a release block, but instead it’s required to find it by name, and then you can configure it.
The dependencies are easy, just functions where you set the name of the dependency:
dependencies {
    compile(Config.Libs.kotlin_std)
    ...
}
Keep building and polishing until the build succeeds.
It’s not easy, but it’s cool!
It’s really awesome to see how Kotlin is reaching all development environments: JVM, JS, Gradle… and potentially everywhere with Kotlin/Native.
This is just another example of the versatility of the language and gives an idea of how enthusiastic the different developer communities are becoming about it.
In the case of Gradle, maybe it’s not yet production-ready (though I know of people that are using it without many issues), but it’s worth giving it a try and check how nice it works once everything is configured.
Having compile time errors and autocomplete is of great help when we’re building our Gradle files, which otherwise requires just hard memory or searching.

What do you think about Kotlin DSL? Have you tried? Are you using it in your projects? Let me know in the comments.


