· 8 min read
Anko layouts on Android. Should I forget about XMLs?

Warning: Anko has been deprecated, here it is some more info and alternatives to this library
If you’re already developing Android Apps using Kotlin, you’ve probably heard about Anko layouts and been thinking about using them, or at least considering to take a look at them.
The truth is that Anko has been around for really long. In fact, when I started writing my book about Kotlin on Android at the beginning of 2015, this library already existed.
But in case you hadn’t heard about it, Anko is a library developed by the Kotlin team with the goal of simplifying the interaction with the Android framework.
Its most outstanding feature is Anko layouts, which I’ll talk about in this article. But it also has others such as small DSL to execute asynchronous tasks in a very simple way, another one to build easy dialogs and alerts, a set of functions to deal with SQLite, and even an implementation of coroutines, among many other things
I must admit that I’m a huge fan of this library, because it has a lot of awesome features and it’s been really helpful to me to understand Kotlin and how to apply it to Android development.
But there’s something in this library that always pushed me back: Anko layouts DSL.
Anko layouts DSL
The idea of Anko layouts is to take the most out of Kotlin to provide a DSL that makes declaring Android layouts easy and powerful, just by getting rid of the XMLs.
I’ve been developing Android Apps for like 6 years, and I’m really fluent with XMLs already. So when I tried to do something with Anko layouts, it was like starting from scratch to me.
But for simple examples, it looked really powerful! I could write a small login form in a breeze. With just this code:
UI(true) {
    verticalLayout {
        val user = editText {
            hint = "Username"
        }
        val pass = editText {
            hint = "Password"
        }
        button("Login") {
            setOnClickListener {
                longToast("User: ${user.text}, Pass: ${pass.text}")
            }
        }
    }
}
I’d get something like this:
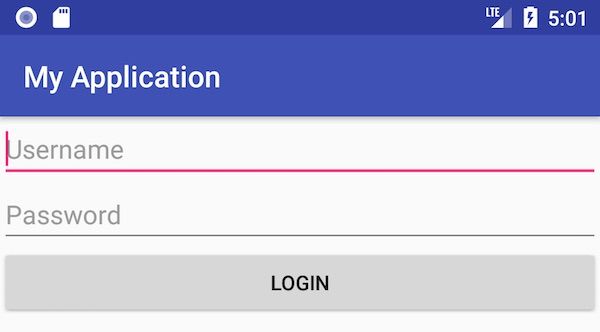
Pretty awesome, right?
But we all know that small samples are never enough to get the whole picture, so I decided to convert my whole Bandhook-Kotlin repo views to Anko layouts. And based on this experience, I decided to write this article
Should I start using Anko layouts to build my projects?
Mimicking the structure I used in the Kotlin DSL article, I will start by trying to answer this question.
In this case it’s not so black or white. Based on my short experience, I wouldn’t use it instead of XML. These are the pros and cons I found:
Pros:
- It’s really easy to start with it: the DSL is really intuitive for simple examples, and the code you need to write is clean and nice to read.
- It skips the inflation step, so the views written with Anko are much faster to initialize than those written in XML. There are some articles like this from Simon Vergauwen that show it’s even 4 times faster.
- Using Kotlin code means you can do more complex things: for instance set a dimension that is the sum of two dimensions, simpler data binding, views are easier to reuse and compose…
But these are the cons I found:
- You need to start learning from scratch: new API, new rules. So, at the beginning, you’ll find some things much more difficult to do than just by using XML. This shouldn’t be a stopper though.
- There are things that are inherently more complex, like styling your views, setting layout params.
- You need to write your views blindly. You don’t have a powerful designer to implement the view, or at least see the view you’re writing. That’s half-true, because there’s a plugin that should show a preview, but I’ve never seen it working, it’s broken quite often. You cannot use
tools:attributes either, which are very useful when doing layouts. - Some things may be even impossible. There are XML properties that sometimes don’t have their equivalent in Java, so you can’t do much here.
In general, I’d encourage you to try it and take your own decisions. I know of people that love Anko layouts, and can understand why.
I can find a very good use case for simple layouts like custom views for dialogs, or adapter views.
How to start using Anko
For a full reference, I recommend you to take a look at the repository, but I’ll tell you here some steps that will help you follow the code.
Add the corresponding dependencies
Anko is split into several libraries, so that you add only what you need. For views, the base one is this:
implementation "org.jetbrains.anko:anko-sdk19:$anko_version"
The SDK you use should correspond to the minimum version you support (or previous). There’s sdk-15, sdk-19, sdk-21, sdk-23 and sdk-25.
So let’s say your minSDK is 17, you should use sdk-15.
Then, depending on what other support libraries you use, you will add the corresponding Anko one:
implementation "org.jetbrains.anko:anko-appcompat-v7:$anko_version"
And there are others for design library, cardview, etc. The complete reference is at Anko repository.
The base activity
You can just do a UI block as I did in the example above, but this can make your activity grow fast. It’s better to have the layout in another class.
So for this, I created a base activity, which will force to declare the property that holds the layout:
abstract class BaseActivity<out UI : ActivityAnkoComponent<out AppCompatActivity>>
    : AppCompatActivity() {
    abstract val ui: UI

    override fun onCreate(savedInstanceState: Bundle?) {
        super.onCreate(savedInstanceState)
        (ui as ActivityAnkoComponent<AppCompatActivity>).setContentView(this)
        setSupportActionBar(ui.toolbar)
    }
}
In onCreate, it sets the view from the property as the view of the activity, and also uses the toolbar from this layout.
The generic type of the activity is just an interface that forces implementers to hold a reference to the toolbar:
interface ActivityAnkoComponent<T : AppCompatActivity> : AnkoComponent<T> {
    val toolbar: Toolbar
}
That way, the activity can use it in onCreate.
Building the layout
Each activity holds an ActivityAnkoComponent, that will be the one in charge to build the activity. Here’s when we’ll use Anko layouts:
override fun createView(ui: AnkoContext<MainActivity>) = with(ui) {

    coordinatorLayout {

        appBarLayout {
            toolbar = themedToolbar(R.style.ThemeOverlay_AppCompat_Dark_ActionBar) {
                backgroundResource = R.color.primary
            }.lparams(width = matchParent) {
                scrollFlags = SCROLL_FLAG_SNAP or SCROLL_FLAG_SCROLL or SCROLL_FLAG_ENTER_ALWAYS
            }
        }.lparams(width = matchParent)

        recycler = autoFitRecycler()
                .apply(AutofitRecyclerView::style)
                .lparams(matchParent, matchParent) {
                    behavior = AppBarLayout.ScrollingViewBehavior()
                }
    }
}
As you can see, the parent class is a CoordinatorLayout, which holds an AppBarLayout with a Toolbar, and a RecyclerView.
An interesting thing is how the layout params are declared. It’s a function where you set width and height by argument (default is WRAP_CONTENT), and then a block to add the rest of extra parameters:
.lparams(matchParent, matchParent) {
    behavior = AppBarLayout.ScrollingViewBehavior()
}
Use custom views
By default, we only have functions for framework and support libraries views, but you can create your own. For instance, in the example above I created autoFitRecycler:
fun ViewManager.autoFitRecycler(theme: Int = 0) = autoFitRecycler(theme) {}
inline fun ViewManager.autoFitRecycler(theme: Int = 0, init: AutofitRecyclerView.() -> Unit)
    = ankoView(::AutofitRecyclerView, theme, init)
You can know more about this at the repository wiki.
Applying styles
For each view, there exists a themed version that allows you to apply a theme, such as the toolbar here:
toolbar = themedToolbar(R.style.ThemeOverlay_AppCompat_Dark_ActionBar)
But, if what you want is to apply a style, you cannot use an XML one. Instead, you need to use the functions apply or applyRecursively. This second one, in case you want to apply the style also to the sub-views:
.applyRecursively { view ->
    when (view) {
        is EditText -> view.textSize = 18f
    }
}
As a way to extract styles, I implemented this extension function for the recycler:
fun AutofitRecyclerView.style() {
    clipToPadding = false
    columnWidth = dimen(R.dimen.column_width)
    scrollBarStyle = View.SCROLLBARS_OUTSIDE_OVERLAY
    horizontalPadding = dimen(R.dimen.recycler_spacing)
    verticalPadding = dip(2)
    addItemDecoration(PaddingItemDecoration(dip(2)))
}
I can then apply the style this way:
recycler = autoFitRecycler()
        .apply(AutofitRecyclerView::style)
And these are basically the rough edges you need to know to understand the code.
There are some more complex views, which use an AppBarLayout with a CollapsingToolbarLayout, which holds an ImageView, a Toolbar and a TabLayout. Then the main area is using a ViewPager. I’m leaving the code here for a reference on how it looks:
coordinatorLayout {

    themedAppBarLayout(R.style.ThemeOverlay_AppCompat_Dark_ActionBar) {
        fitsSystemWindows = true

        collapsingToolbarLayout = collapsingToolbarLayout {
            fitsSystemWindows = true
            collapsedTitleGravity = Gravity.TOP
            expandedTitleMarginBottom = dip(60)

            image = squareImageView {
                fitsSystemWindows = true
            }.lparamsC(matchParent) {
                collapseMode = COLLAPSE_MODE_PARALLAX
            }

            toolbar = toolbar {
                popupTheme = R.style.ThemeOverlay_AppCompat_Light
                titleMarginTop = dip(16)
            }.lparamsC(width = matchParent, height = dip(88)) {
                gravity = Gravity.TOP
                collapseMode = COLLAPSE_MODE_PIN
            }

            tabLayout = tabLayout {
                setSelectedTabIndicatorColor(Color.WHITE)
            }.lparamsC(width = matchParent) {
                gravity = Gravity.BOTTOM
            }

        }.lparams(width = matchParent) {
            scrollFlags = SCROLL_FLAG_SCROLL or SCROLL_FLAG_EXIT_UNTIL_COLLAPSED
        }

    }.lparams(width = matchParent)

    viewPager = viewPager {
        id = View.generateViewId()
    }.lparams {
        behavior = AppBarLayout.ScrollingViewBehavior()
    }
}
Kotlin and Anko Layouts, an interesting combination
It’s true that working with this DSL is quite fun, and when you overcome the first part of the learning curve, you’ll probably enjoy it.
My experience with it was good at the beginning, but not so much when I started doing some more complex things. The worst part for me is not having a good preview I can rely on.
For instance, I have a problem with the artists layout, and it’s really difficult to fix just by compiling and running all the time.
But as I said, it’s probably that I haven’t spent enough time playing with it. So try it before making a decision.
And if you’re an Anko lover, please shout in the comments and tell us why! I’ll be happy to learn from your experience 🙂
Remember there’s a full example at Bandhook-Kotlin repository.