· 4 min read
RecyclerView in Android: The basics

Google I/O this week brought a lot of exciting news about Android, and we probably need quite some time to get used to what Android L is bringing.
I’ve been playing with RecyclerView these days, and will give you a little presentation of what I discovered so far.
RecyclerView: What it is?
The RecyclerView is a new ViewGroup that is prepared to render any adapter-based view in a similar way. It is supossed to be the successor of ListView and GridView, and it can be found in the latest support-v7 version.
The RecyclerView has been developed with extensibility in mind, so it is possible to create any kind of layout you can think of, but not without a little pain-in-the-ass dose. This is Android, so things are never easy.
If you want to use a RecyclerView, you will need to feel comfortable with three elements:
- RecyclerView.Adapter
- LayoutManager
- ItemAnimator
RecyclerView.Adapter
RecyclerView includes a new kind of adapter. It’s a similar approach to the ones you already used, but with some peculiarities, such as a required ViewHolder. You will have to override two main methods: one to inflate the view and its view holder, and another one to bind data to the view. The good thing about this is that first method is called only when we really need to create a new view. No need to check if it’s being recycled.
public class MyRecyclerAdapter extends RecyclerView.Adapter<MyRecyclerAdapter.ViewHolder> {
    private List<ViewModel> items;
    private int itemLayout;

    public MyRecyclerAdapter(List<ViewModel> items, int itemLayout) {
        this.items = items;
        this.itemLayout = itemLayout;
    }

    @Override
    public ViewHolder onCreateViewHolder(ViewGroup parent, int viewType) {
        View v = LayoutInflater.from(parent.getContext())
            .inflate(itemLayout, parent, false);
        return new ViewHolder(v);
    }

    @Override
    public void onBindViewHolder(ViewHolder holder, int position) {
        ViewModel item = items.get(position);
        holder.text.setText(item.getText());
        holder.image.setImageBitmap(null);
        Picasso.with(holder.image.getContext()).cancelRequest(holder.image);
        Picasso.with(holder.image.getContext()).load(item.getImage()).into(holder.image);
        holder.itemView.setTag(item);
    }

    @Override
    public int getItemCount() {
        return items.size();
    }

    public static class ViewHolder extends RecyclerView.ViewHolder {
        public ImageView image;
        public TextView text;

        public ViewHolder(View itemView) {
            super(itemView);
            image = (ImageView) itemView.findViewById(R.id.image);
            text = (TextView) itemView.findViewById(R.id.text);
        }
    }
}
That’s a simple Adapter. But things start to get complicated. There isn’t (or at least I didn’t found) a onItemClickListener on RecyclerView. So the adapter will be a good candidate to handle the events.
If you want to add or remove items from the adapter, you will need to explicitly inform the adapter. That’s a bit different from the former notifyDataSetChanged():
public void add(ViewModel item, int position) {
    items.add(position, item);
    notifyItemInserted(position);
}

public void remove(ViewModel item) {
    int position = items.indexOf(item);
    items.remove(position);
    notifyItemRemoved(position);
}
LayoutManager
This is the class that will decide in which part of the screen the views are placed. But that’s only one of its many responsibilities. It must be able to manage scrolling and recycling among others.
There’s only one implemented class of this LayoutManager. It’s called LinearLayoutManager, and it is above 1500 lines of code, only for you to understand the complexity. This manager is able to simulate a ListView (both vertical and horizontal), without headers or footers.
Subclassing LayoutManager is not for rookies at all, and we will have to rely on community to achieve RecyclerView full potential. Along with the example, I will be uploading in short time an implementation for GridView.
I think the key behind this is to create a BaseLayoutManager from LinearLayoutManager code and extend it from here. Probably the final version of support-v7 will come with more and better implementations.
ItemAnimator
ItemAnimator will animate ViewGroup modifications that are notified to adapter. Basically it will automatically animate adding and removing items. That’s not an easy class either, and we find a DefaultItemAnimator that works quite well.
RecyclerView setup
So, in the end, if you want to initialize a working RecyclerView, you will need to do something like this:
RecyclerView recyclerView = (RecyclerView) findViewById(R.id.list);
recyclerView.setHasFixedSize(true);
recyclerView.setAdapter(new MyRecyclerAdapter(createMockList(), R.layout.item));
recyclerView.setLayoutManager(new LinearLayoutManager(this));
recyclerView.setItemAnimator(new DefaultItemAnimator());
setHasFixedSize() is used to let the RecyclerView that its size will keep the same. This information will be used to optimize itself.
Conclusion
RecyclerView is indeed a powerful view, and its limits will be more in the part of the developer that the view itself. The learning curve may be hard, but I’m sure that Android community will soon release awesome implementations of LayoutManager.
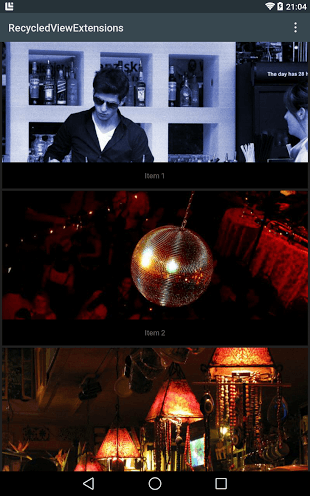
I’m creating a github repository, where you can find this example. It will serve as the basis for an extension library I’m planning to create. You will be able to test a GridView implementation. Any feedback will be welcomed.
RecyclerViewExtensions on Github


