· 3 min read
Create your first Android project using Kotlin (KAD 01)

Today I’m starting a set of 30 articles about Kotlin for Android Developers (KAD). In these articles I’ll be talking about the most important parts of the language and how they apply to Android development.
From the very beginning, so if you’ve heard about Kotlin but never tried, then this articles are perfect for you. ¡Hope you enjoy them!
In today’s article, I want to show you how easy is to create an Kotlin project from scratch.
If you prefer the video, here I explain you how to create a new project and all about variables:
https://www.youtube.com/watch?v=iRpvLmOxAjw
Creating an Android project for Kotlin from scratch
First thing you need is to download the latest stable version of Android Studio. Canary or Beta should be OK, but new versions sometimes break the Kotlin plugin for some days.
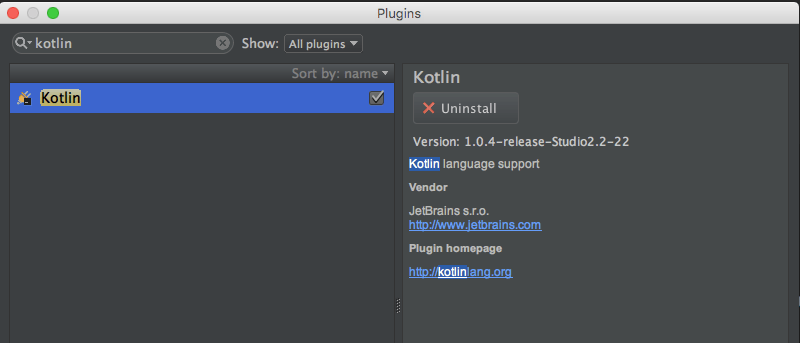
Once done, install the Kotlin plugin. IntelliJ comes with it already installed by default, but it’s not the same for Android Studio.
1. Install Kotlin plugin
In order to do this, go to Plugins section in “Preferences”, and use the search bar to find it:

2. Create a new Android project
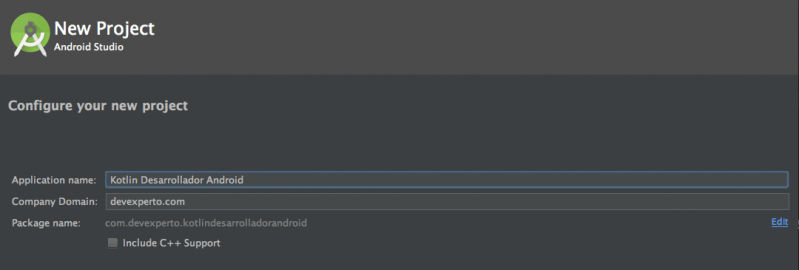
Now that you’ve installed your plugin (you can even do it later if you want), create an Android Project.
Nothing different from a regular project:

Choose “Blank Screen” among the “New Activity” options. It will be easier to convert the code later.
3. Convert the new Activity to Kotlin code
You just need to select a menu option. Literally.
The Kotlin plugin includes a conversor from Java to Kotlin code (not the other way round, but you won’t want it anyway 😝). Just open the class you want to convert and choose the option Code -> Convert Java File to Kotlin File.
And that’s all. This is the result of the operation:
class MainActivity : AppCompatActivity() {
    override fun onCreate(savedInstanceState: Bundle?) {
        super.onCreate(savedInstanceState)
        setContentView(R.layout.activity_main)
    }
}
As you can see, though there are some similarities with Java code, there are many other differences. You’ll learn some of them in next articles.
4. Convert the project to a Kotlin project
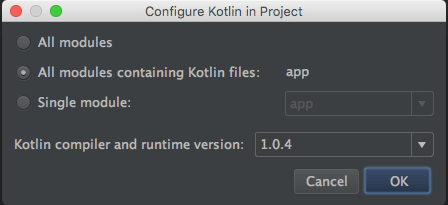
Another utility of the plugin will do this for you. Just go to Tools -> Kotlin -> Configure Kotlin in Project, and use the dialog to add some changes to build.gradle files:

What did this change? A new dependency to the Kotlin plugin was added in the root build.gradle:
dependencies {
    classpath 'com.android.tools.build:gradle:2.2.0'
    classpath "org.jetbrains.kotlin:kotlin-gradle-plugin:$kotlin_version"
}
It also applied the Kotlin plugin to the module build.gradle:
apply plugin: 'kotlin-android'
And added the Kotlin library as a dependency:
dependencies {
    ...
    compile "org.jetbrains.kotlin:kotlin-stdlib:$kotlin_version"
}
Conclusion
And that’s all! You can now run the project and see how it perfectly works.
The compilation will take a little more than Java the first time and, according to this article, incremental builds would be even faster than Java.
Cool, right? Let me know what you think in the comments section.
And if you want to learn how to use Kotlin to develop your own Android Apps, I recommend you take a look at my free training. Reserve your place!


